You have no items in your shopping cart.

Interlocking garage floor tiles are a great way to transform your garage space, while also installing flooring that is chemical-resistant, slip-resistant, durable, and able to tolerate a high rolling weight capacity.
But how are interlocking garage floor tiles installed? In the following guide, we’re going to give you step-by-step instructions on how to install your tiles in your garage space, without the need for a professional installation expert. Let’s take a look!
What are interlocking floor tiles?
Interlocking floor tiles are a versatile and easy-to-install flooring solution designed to connect seamlessly with one another. Each tile features specially designed edges that lock together - similar to puzzle pieces - creating a secure and uniform surface. They are a popular choice for garage floors, as well as other residential, commercial, and industrial applications due to their durability, low maintenance, and ease of installation.
What are the benefits of interlocking floor tiles?
Easy installation and customization
Interlocking garage floor tiles are an attractive option for many homeowners due to their ease of installation: interlocking tiles are designed to fit together like puzzle pieces or “snap” together, allowing you to quickly and efficiently cover your garage floor without the need for a professional installation expert. When you opt for certain brands - such as Swisstrax flooring - you can also choose from a variety of sizes, colors, and patterns, which makes it simple for you to create a custom design that suits your taste and the aesthetic of your garage. Whether you prefer a simple, monochrome pattern or an intricate, multi-colored design, interlocking tiles make it possible to achieve your desired look with minimal effort.
Enhanced durability and protection
Another of the primary reasons homeowners opt for interlocking garage floor tiles is their durability. These tiles are typically made from high-quality materials, such as PVC or rigid polypropylene, which are designed to withstand heavy rolling loads as well as resist regular wear and tear. This makes them ideal for garages that experience frequent traffic from vehicles and heavy equipment. Additionally, these tiles provide a protective barrier between your garage floor and any spills or leaks, preventing potential damage from corrosive chemicals, oil, or other liquids. This enhanced protection not only preserves the lifespan of your garage floor but also contributes to a safer, cleaner workspace.
Ergonomic and low maintenance design
Another significant advantage of interlocking garage floor tiles is their low-maintenance nature. Their stain-resistant properties make it easy to clean up spills or dirt, often requiring only a simple mop or broom to remove debris. This can save you time and effort compared to other flooring options that may necessitate more laborious cleaning processes. Additionally, if a tile becomes damaged, you can quickly replace it without needing to redo the entire floor. This modular design makes it easy to maintain a pristine and functional garage floor for years to come.
Tools needed to install interlocking garage floor tiles
So, what do you need to install interlocking garage floor tiles yourself at home? Depending on what brand you opt for, you may need additional tools, but here’s what you’ll generally need for most types of tile installation:
- Measuring tape - To measure the dimensions of your garage floor accurately, which helps determine the number of tiles needed and assists in planning the layout.
- Rubber mallet - To gently tap the tiles into place and ensure a secure, snug fit between the interlocking edges.
- Utility knife or jigsaw - To trim and cut the tiles to fit around obstacles, corners, or edges. A sharp utility knife can handle most PVC tiles, while a jigsaw may be necessary for cutting thicker or more rigid materials.
- Straight edge or t-square - To guide your cuts and ensure straight, clean edges when trimming tiles.
- Pencil or marker - To mark cutting lines on the tiles. Safety equipment: Protective gloves, safety goggles, and a dust mask should be worn while cutting tiles to prevent injury.
- Knee pads - To provide comfort and protection for your knees while working on the floor.
- Level: To check that the tiles are sitting evenly and flat on the floor.
- Broom or vacuum: To clean the garage floor before installation, removing any dirt, debris, or dust that could interfere with the tiles' fit. \
Note that some manufacturers instructions may be different; for example, if you’re installing Swisstrax tiles, you might want to take a look at our guide on how to install Swisstrax tiles over on our blog.
How to install interlocking garage floor tiles
While you should always read the manufacturer’s instructions thoroughly, here is a step-by-step guide that you can follow for a smooth and simple installation process:
Prepare the area
Begin by clearing your garage or workspace of any furniture, equipment, or debris - you can thoroughly clean the floor by using a broom or vacuum to remove any dirt and dust.
Plan the layout
Measure the dimensions of the area to be covered and determine the number of tiles required. Then plan the layout, starting from the center or one corner of the room, depending on your preference. Ensure that the pattern and direction of the tiles align with your desired design.
Dry fit
Before installing the tiles, lay them out in your planned pattern without connecting them. This step allows you to visualize the final result and make any necessary adjustments to the layout.
Begin installation
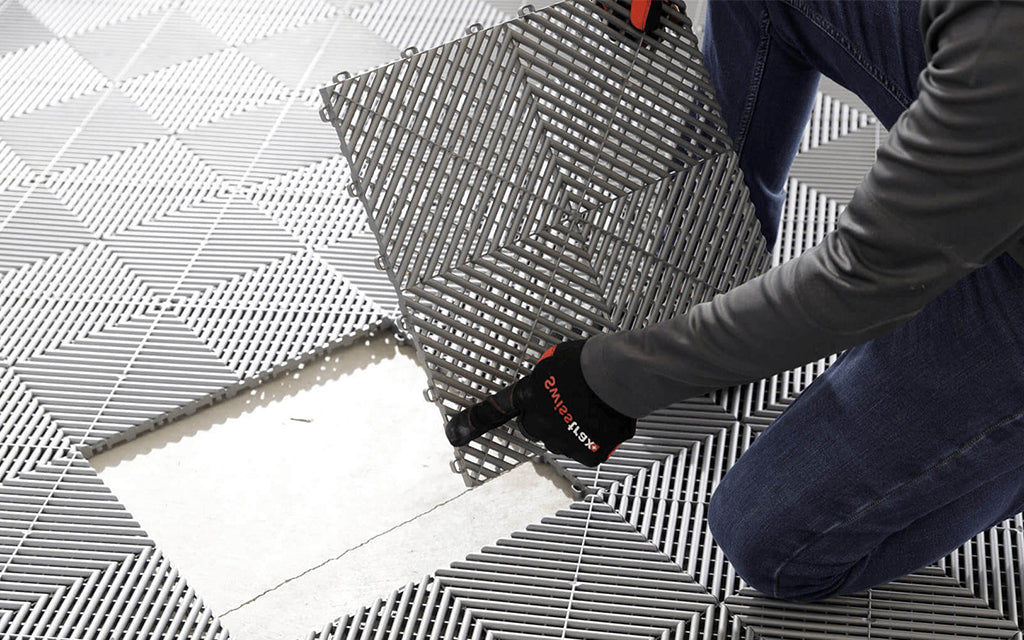
Start connecting the tiles together by aligning the interlocking edges and gently pressing them down. Use a rubber mallet to tap the tiles into place, ensuring a snug fit between the interlocking edges.
Cut tiles as needed
When you reach the edges or obstacles such as support columns, you may need to trim the tiles to fit. Measure and mark the cutting lines using a pencil or marker, then use a utility knife or jigsaw to cut the tiles along the marked lines. Use a straight edge or T-square as a guide for precise cuts.
Install cut tiles
Place the cut tiles in their respective positions and interlock them with the surrounding tiles, using the rubber mallet to secure the connections. Inspect the floor: Once all tiles are installed, check the floor for any uneven or loose tiles. If necessary, adjust or replace tiles to ensure a flat, secure surface.
Clean up
Remove any debris or dust resulting from the installation process. And there you have it - your new interlocking floor is now ready for use!


